The below is lifted from https://www.windowscentral.com/how-set-windows-11-without-microsoft-account
The relevant and useful bits were:
- Shift+F10 to open the command prompt
- `ipconfig /release` to disconnect a WiFi connection and force the system to think it had no internet connection
- `oobe\bypassnro` to disable the internet connection requirements. In Windows 10 you were able to say "I don't have internet" but now that's no longer an option
## Source Text
Windows 11 install with a Microsoft account (Image credit: Windows Central)
On Windows 11, Microsoft wants you to set up your device with a Microsoft account since it offers some additional benefits, including better integration with the company's cloud services (such as OneDrive and Office), content synchronization between computers, and better security.
Although there are additional benefits to using an online account, many users still want to use the more traditional experience with a local account. The problem is that the company is making it harder to set up Windows 11 without a Microsoft account. For example, Microsoft has already removed the option from the initial setup of Windows 11 Home, and it [plans to remove it from the Windows 11 Pro setup](https://www.windowscentral.com/windows-11-pro-will-soon-require-internet-connection-when-setting-first-time) in future releases.
However, whether you are installing the Home or Pro edition of Windows 11, you have a few workarounds (via [Reddit](https://www.reddit.com/r/Windows11/comments/tvdaxl/psa_you_can_set_up_windows_11_without_a_microsoft/)) to set up an installation with a local account instead of a Microsoft account. In this Windows 11 guide, we will walk you through the different ways to set up a new installation without a Microsoft account.
## Install Windows 11 without a Microsoft account
If you want to set up a Windows 11 device without a Microsoft account, you need to proceed with the traditional setup and use one of the available solutions in the out-of-box experience (OOBE).
RECOMMENDED VIDEOS FOR YOU...
Windows Central
Windows Central
Hands-On: Surface Duo 2 - January 2022 Update
0 of 4 minutes, 31 seconds, Volume 0%
## Windows 11 setup wizard
These instructions walk you through the clean installation process. If you are setting up a new laptop or desktop computer that came pre-installed with Windows 11, you can skip these steps and continue with the [network disconnect](https://www.windowscentral.com/how-set-windows-11-without-microsoft-account#oobe_disconnect_disconnect) or [disable internet requirement](https://www.windowscentral.com/how-set-windows-11-without-microsoft-account#oobe_disable_internet_requirement) solutions.
**Warning:** This process will delete everything on the computer. Before proceeding, it's recommended to [back up your computer](https://www.windowscentral.com/how-create-full-backup-your-windows-11-pc).
To start a fresh installation of Windows 11, use these steps:
1. Start the PC with **Windows 11 USB flash drive**.**Quick note:** If you cannot start the computer from the USB bootable drive, you can [use these instructions](https://www.windowscentral.com/how-do-clean-install-windows-11).
2. On prompt, press any key to boot from the device.
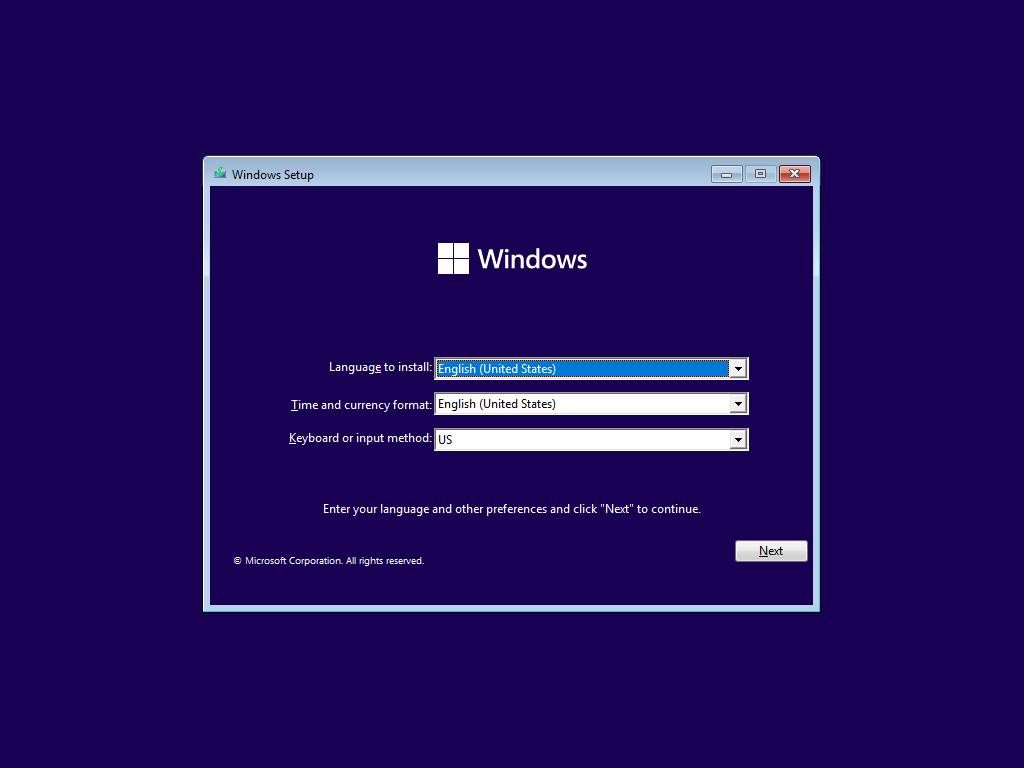
3. On Windows Setup, click the **Next** button.**Quick tip:** If your language, time and currency, and keyboard are different from the default selections, select the correct settings before continuing.
Source: Windows Central (Image credit: Source: Windows Central)
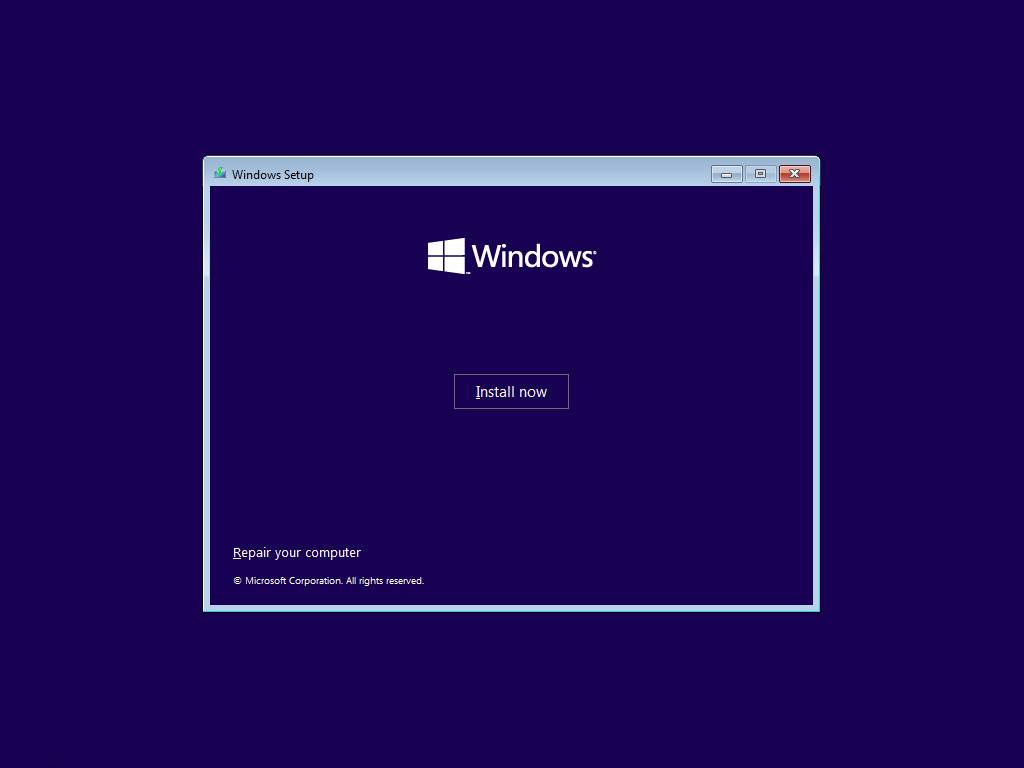
4. Click the **Install now** button.
Source: Windows Central (Image credit: Source: Windows Central)
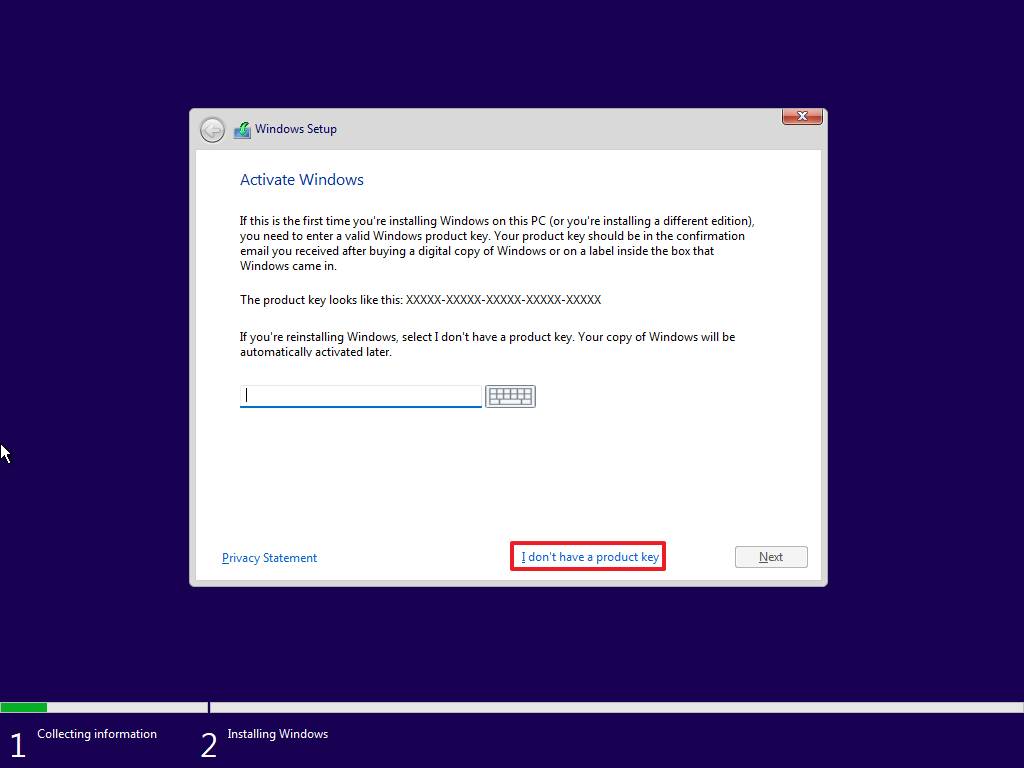
5. If this is a reinstallation, click the **I don't have a product key** option to continue. Otherwise, if this is your first time installing Windows 11, enter the product key.**Quick tip:** You can always complete the installation and activate it using the Settings app.
Source: Windows Central (Image credit: Source: Windows Central)
6. Click the **Next** button.
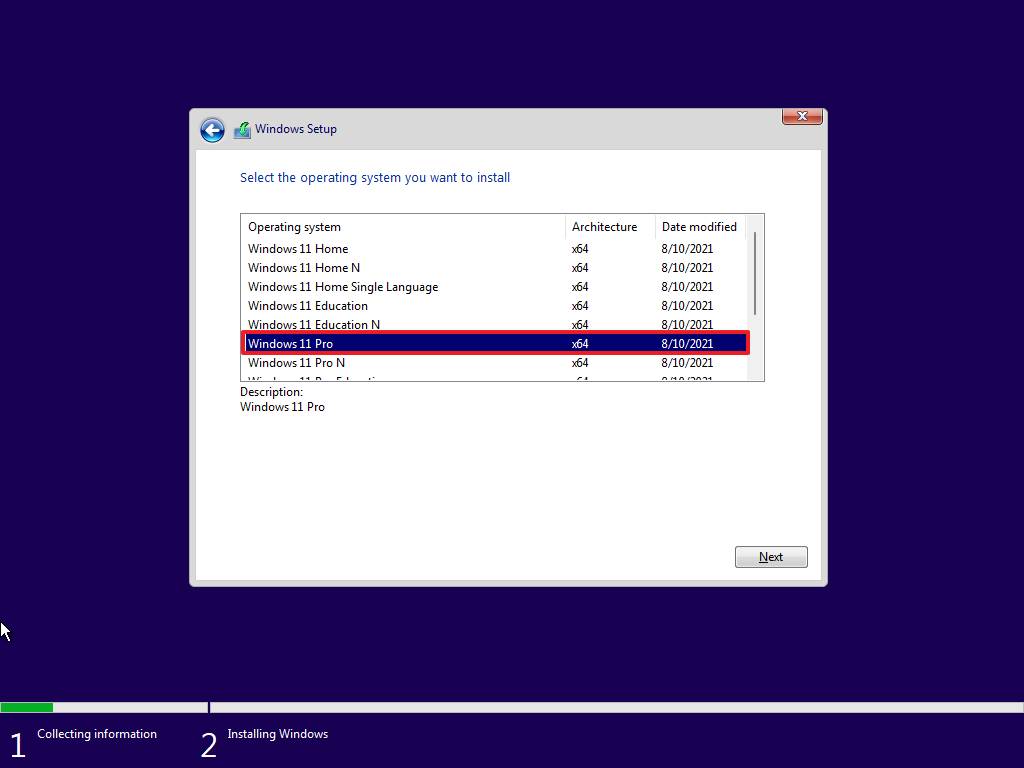
7. Select the edition of Windows 11 (If applicable).
Source: Windows Central (Image credit: Source: Windows Central)
8. Click **Next**.
9. Select the **I accept the license terms** option to continue.
10. Click **Next**.
11. Click the **Custom: Install Windows only (advanced)** option to continue with a clean installation.
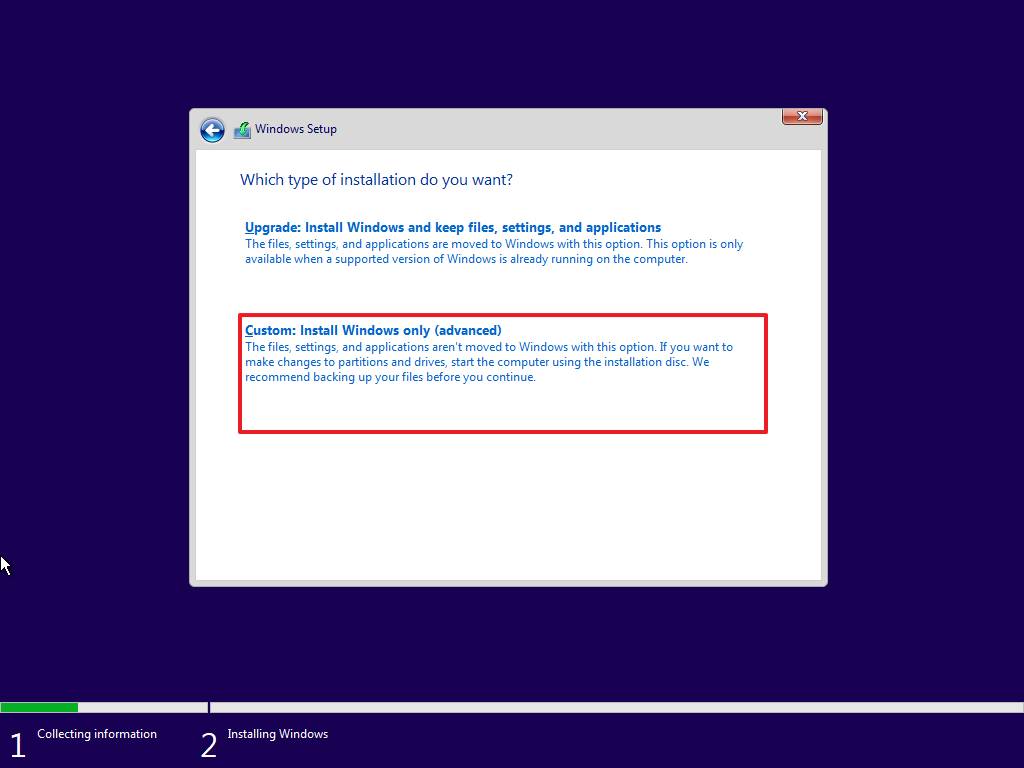
Source: Windows Central (Image credit: Source: Windows Central)
12. Select the partition with the current installation (usually "Drive 0"), and click the **Delete** button.**Quick tip:** If "Drive 0" has multiple partitions, you have to select and delete each partition to allow the setup to use the entire hard drive for the new setup. The Windows 11 setup will create the required partitions automatically during the process. It's also not necessary to delete the partitions on secondary drives.
13. Click the **Yes** button.
14. Select the empty drive (Drive 0 Unallocated Space).
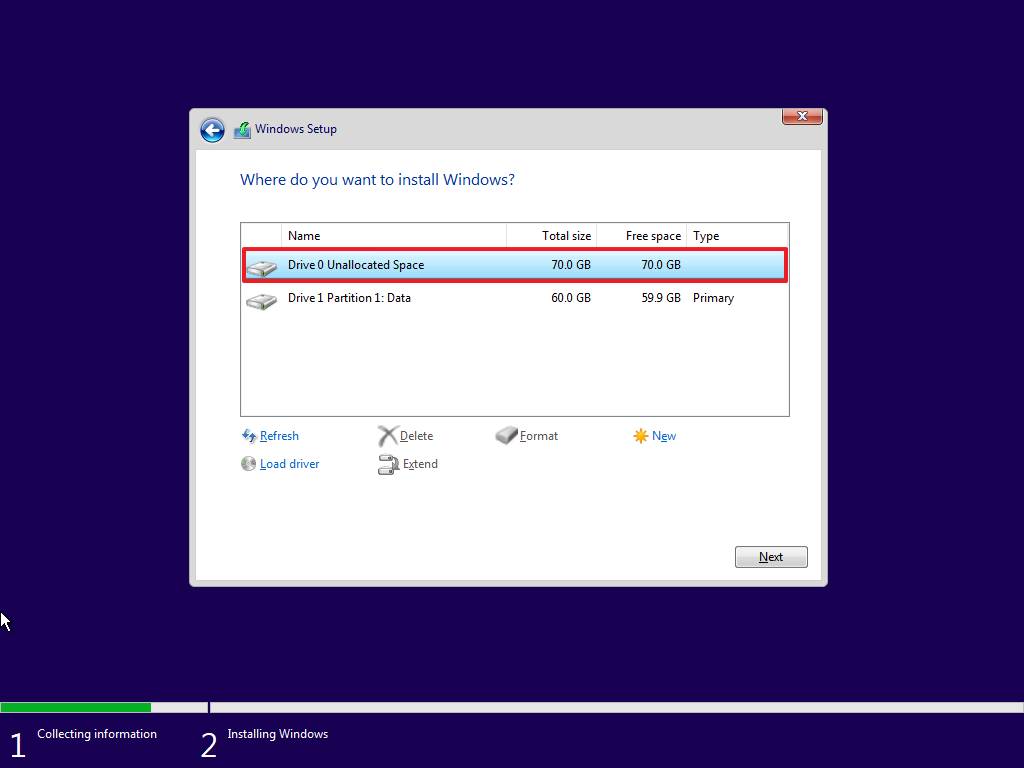
Source: Windows Central (Image credit: Source: Windows Central)
15. Click the **Next** button.
Once you complete the steps, the installation process will occur, and then in the out-of-box experience (OOBE), you can proceed in one of two ways. You can use [network disconnect](https://www.windowscentral.com/how-set-windows-11-without-microsoft-account#oobe_disconnect_disconnect) to disconnect from the network to make the local account option available. Or you can use the [disable internet requirement](https://www.windowscentral.com/how-set-windows-11-without-microsoft-account#oobe_disable_internet_requirement) option to disable the requirement through the initial setup to configure an account without a Microsoft account. Alternatively, you can also [type an incorrect local account information](https://www.windowscentral.com/how-set-windows-11-without-microsoft-account#oobe_local_instead_msa) that returns an error that falls back to the local account creation.
It's important to note that at the time of this writing, if you are setting up a Windows 11 Pro installation, during the account setup, you will still be able to continue without a Microsoft account using the offline account option.
## Out-of-box experience (OOBE) network disconnect
To complete the out-of-box experience on Windows 11, use these steps:
1. Select your region.
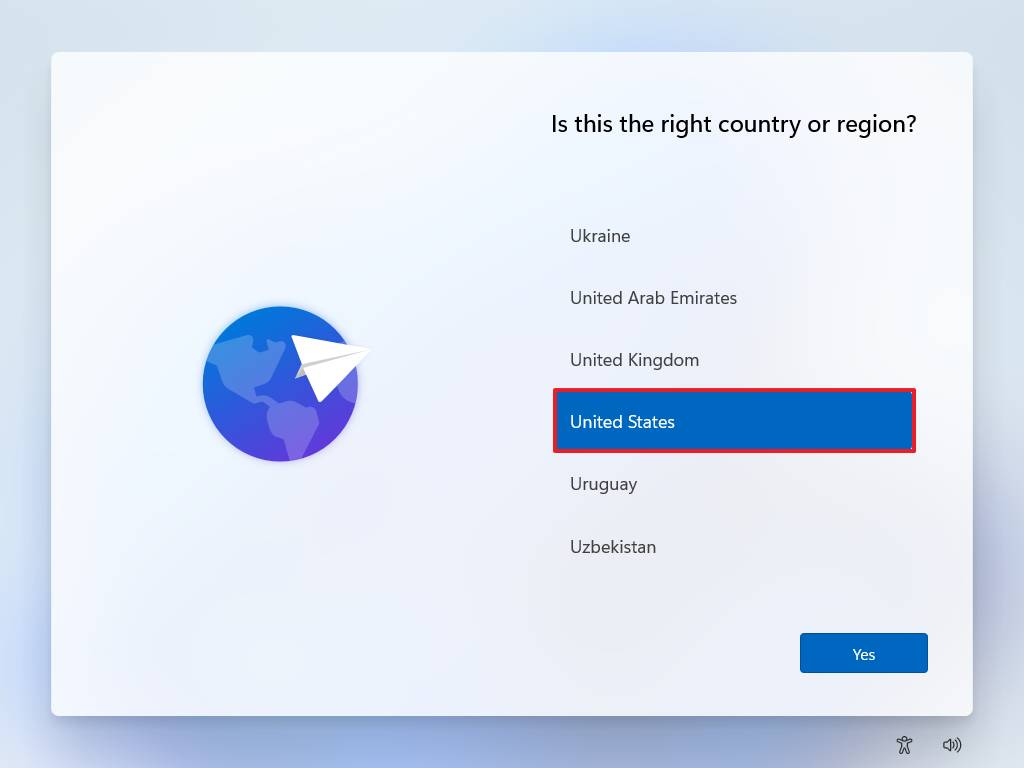
Source: Windows Central (Image credit: Source: Windows Central)
2. Click the **Next** button.
3. Select your keyboard layout setting.
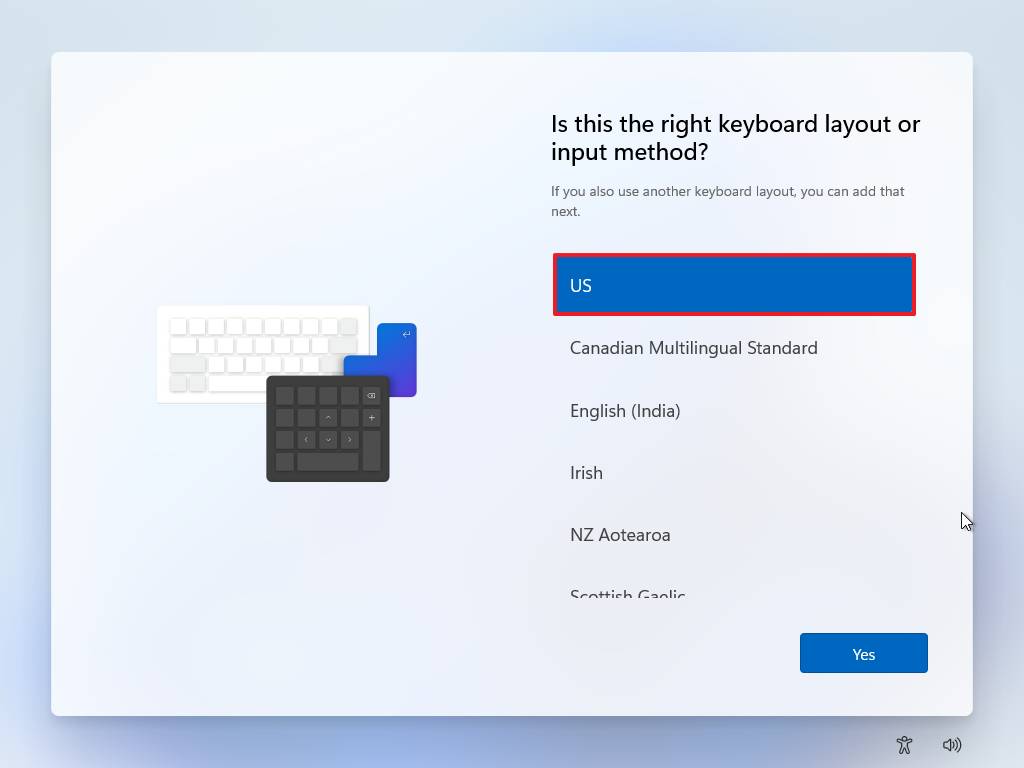
Source: Windows Central (Image credit: Source: Windows Central)
4. Click the **Yes** button.
5. Click the **Skip** button.
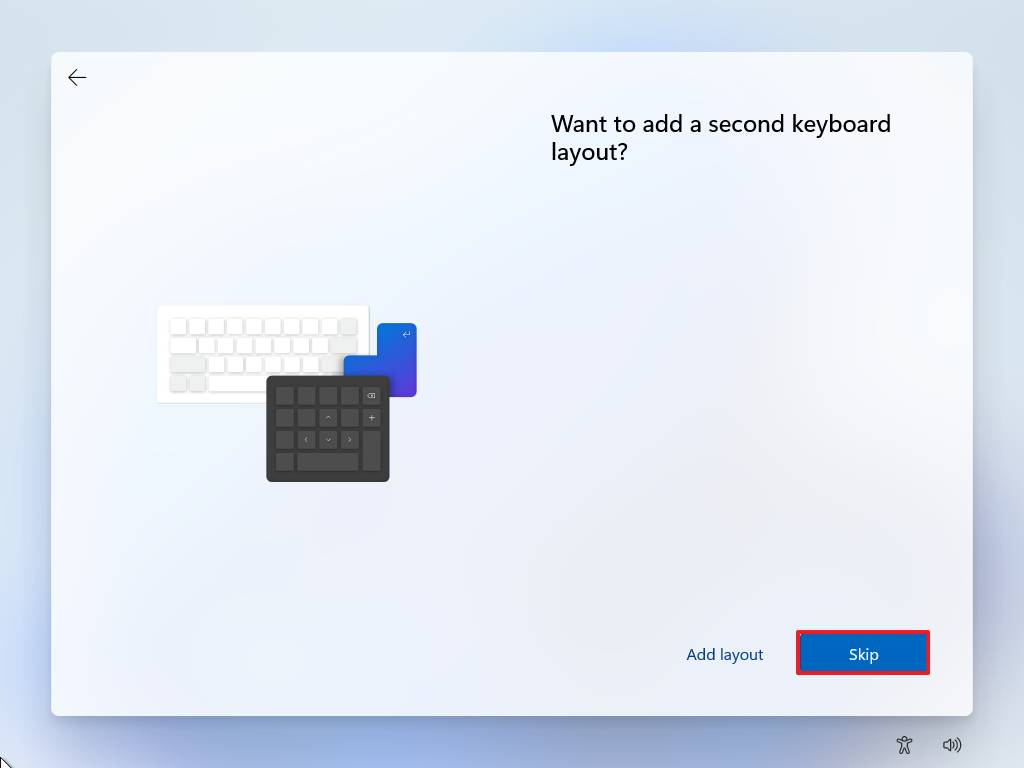
Source: Windows Central (Image credit: Source: Windows Central)
6. Connect to the Wi-Fi network (if applicable).**Quick note:** If you use an Ethernet connection, the device will connect automatically to the network.
7. (Optional) Confirm a name for the device.
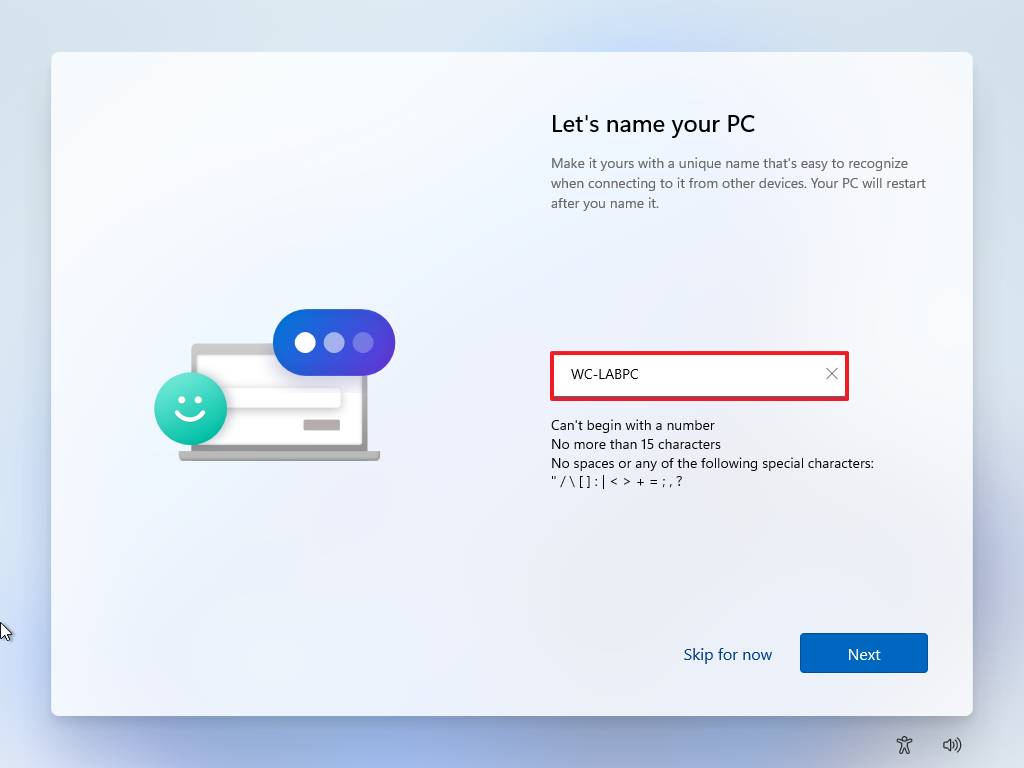
Source: Windows Central (Image credit: Source: Windows Central)
8. Click the **Next** button.**Quick note:** If you proceed with this step, the device will restart automatically, but you will be able to pick up where you left off.
Continue with **Solution 1** to use Command Prompt to remove the current network configuration or **Solution 2** to disconnect the device from the network to fall back to the screen that lets you create a local account.
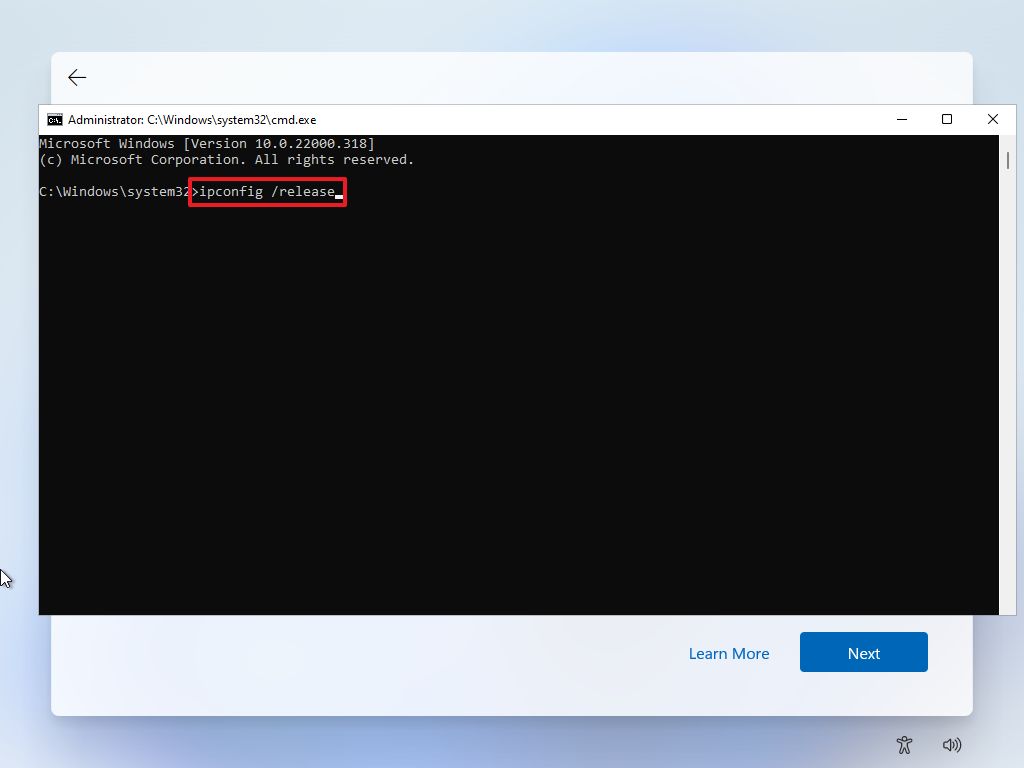
**Solution 1: Command Prompt**
To remove the network configuration to create an account without a Microsoft account, use these steps:
1. Use the **Shift + F10** keyboard shortcut to open Command Prompt.
2. Type the following command to release the current network configuration and press **Enter**:`ipconfig /release`
Source: Windows Central (Image credit: Source: Windows Central)
3. Close the **Command Prompt** console.
4. Click the **Back** button.
5. Confirm the name of the local account.
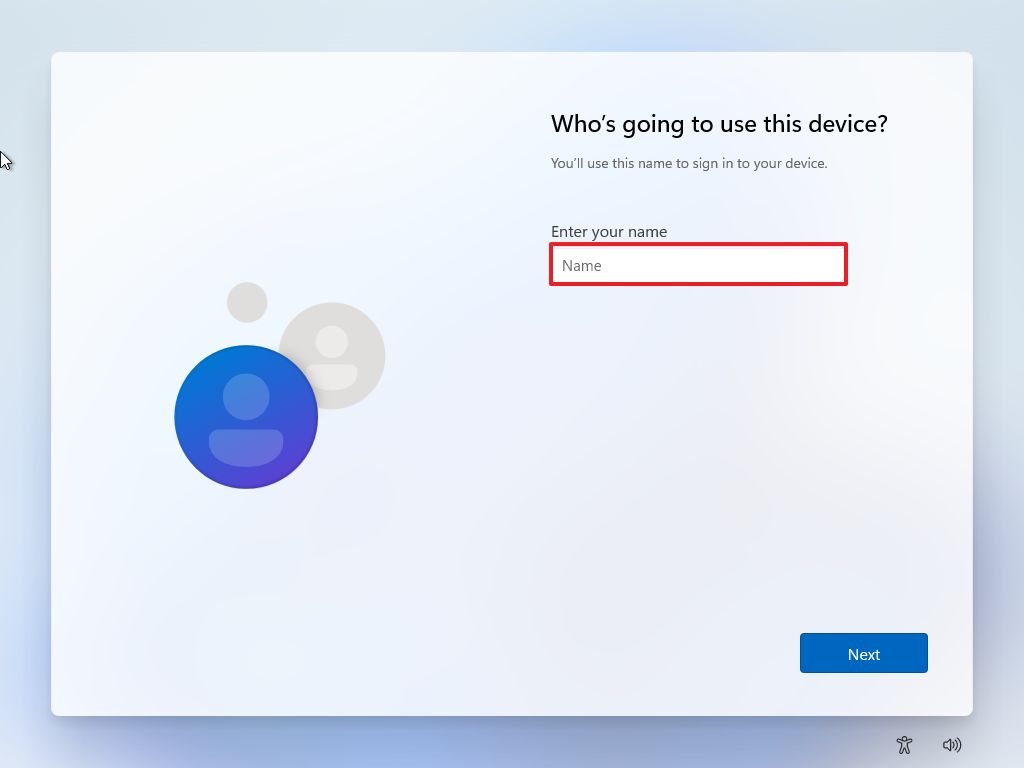
Source: Windows Central (Image credit: Source: Windows Central)
6. Click the **Next** button.
7. Create a password for the account.
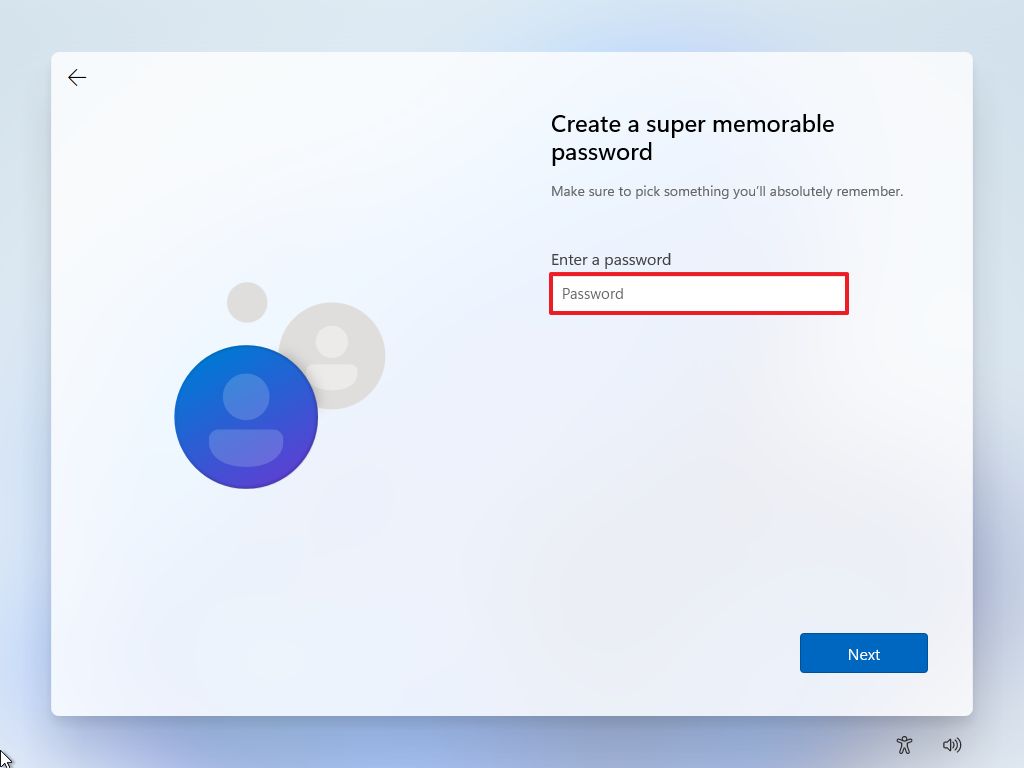
Source: Windows Central (Image credit: Source: Windows Central)
8. Click the **Next** button.
9. Choose your privacy settings.
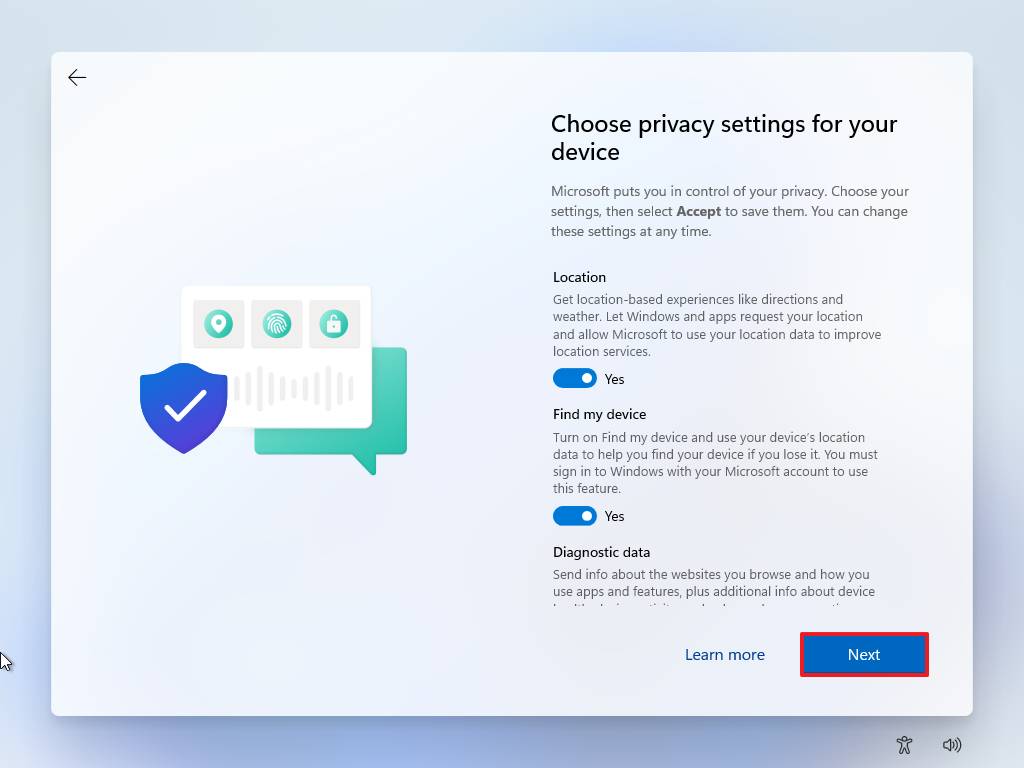
Source: Windows Central (Image credit: Source: Windows Central)
10. Click the **Next** button.
11. Click the **Next** button again.
12. Click the **Accept** button.
While this option may work at the moment, it may not work in future releases of Windows 11.
**Solution 2: Disconnect network**
If you have an Ethernet (wired) connection, use these steps:
1. Disconnect the network cable.
2. Click the **Back** button.
3. Confirm the name of the local account.

Source: Windows Central (Image credit: Source: Windows Central)
4. Click the **Next** button.
5. Create a password for the account.

Source: Windows Central (Image credit: Source: Windows Central)
6. Click the **Next** button.
7. Choose your privacy settings.

Source: Windows Central (Image credit: Source: Windows Central)
8. Click the **Next** button.
9. Click the **Next** button again.
10. Click the **Accept** button.
If you have a Wi-Fi (wireless) connection, use these steps:
1. Turn off Wi-Fi.**Quick note:** If you have a laptop, the keyboard may have a dedicated key to disconnect from the network. If you use a USB dongle, disconnect it from the computer. If you cannot disable the wireless connection, then use "Solution 1." You could also turn off the router in the house (not in the office) momentarily to prevent connection to the internet.
2. Click the **Back** button.
3. Confirm the name of the local account.

Source: Windows Central (Image credit: Source: Windows Central)
4. Click the **Next** button.
5. Create a password for the account.

Source: Windows Central (Image credit: Source: Windows Central)
6. Click the **Next** button.
7. Choose your privacy settings.

Source: Windows Central (Image credit: Source: Windows Central)
8. Click the **Next** button.
9. Click the **Next** button again.
10. Click the **Accept** button.
After you complete the steps, the setup will be complete with a local account instead of a Microsoft account.
## Out-of-box experience (OOBE) disable internet requirement
To set up a Windows 11 device without a Microsoft account disabling the internet requirements, use these steps:
1. Disconnect then Ethernet network cable (if applicable).
2. Select your region.

Source: Windows Central (Image credit: Source: Windows Central)
3. Click the **Next** button.
4. Select your keyboard layout setting.

Source: Windows Central (Image credit: Source: Windows Central)
5. Click the **Yes** button.
6. Click the **Skip** button.

Source: Windows Central (Image credit: Source: Windows Central)
Once you complete the steps, you can continue with the steps below to configure an account without a Microsoft account.
**Solution 3: Disable internet requirements**
In the "Let's connect you to a network" page, use these steps:
1. Use the **Shift + F10** keyboard shortcut to open Command Prompt.
2. Type the following command to release the current network configuration and press **Enter**:`oobe\bypassnro`**Quick note:** The command is a single phrase without spaces.
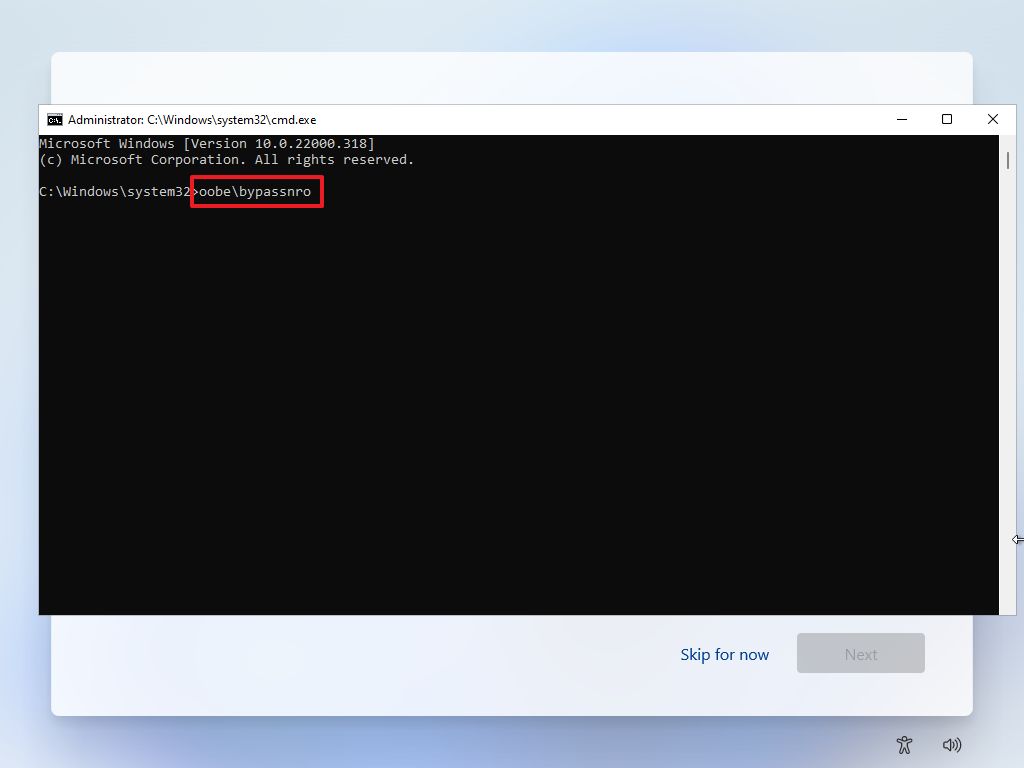
Source: Windows Central (Image credit: Source: Windows Central)
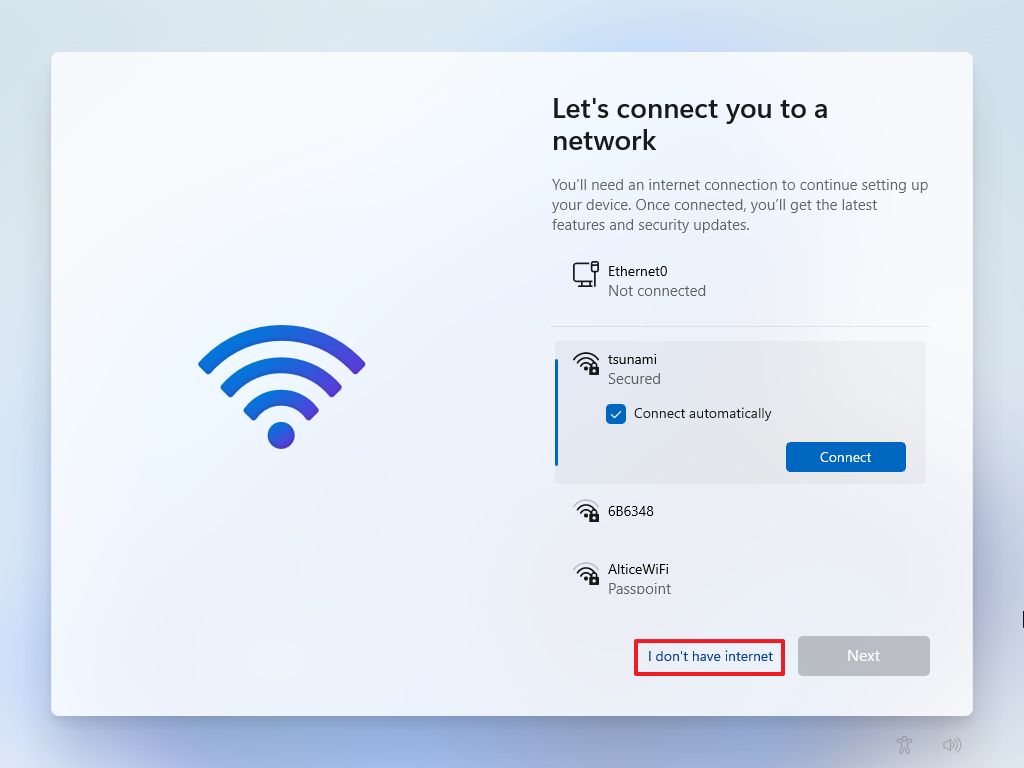
3. Computer will boot automatically, and you may need to start the out-of-box experience again.
4. Click the **I don't have internet** option.
Source: Windows Central (Image credit: Source: Windows Central)
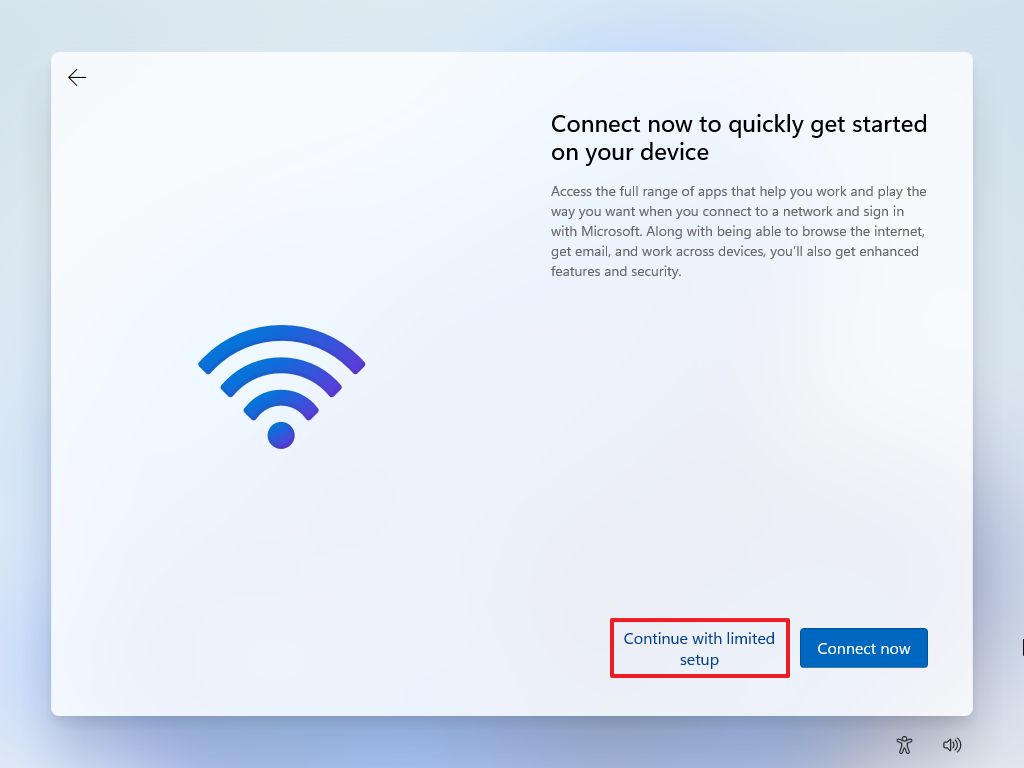
5. Click the **Continue with limited setup** option.
Source: Windows Central (Image credit: Source: Windows Central)
6. Confirm the name for the local account.

Source: Windows Central (Image credit: Source: Windows Central)
7. Click the **Next** button.
8. Create a password for the account.

Source: Windows Central (Image credit: Source: Windows Central)
9. Click the **Next** button.
10. Complete the three security questions to recover the account (if applicable).
11. Click the **Next** button.
12. Choose your privacy settings.

Source: Windows Central (Image credit: Source: Windows Central)
13. Click the **Next** button.
14. Click the **Next** button again.
15. Click the **Accept** button.
After you complete the steps, the out-of-box experience will restart, letting you bypass the internet requirements to give you the option to create a local account.
## Out-of-box experience (OOBE) typing local account during account creation
Alternatively, you can also type a local account and password instead of a Microsoft account in the "Let's add your Microsoft account" page (via [@coreymccowan](https://twitter.com/coreymccowan/status/1516099802429222912)). When you do this, the "Oops, something went wrong" error will appear, and the system will fall back to the local account creation interface whether you are in Windows 11 Home or Pro.
To set up a Windows 11 device without a Microsoft account by typing a local account, use these steps:
1. Select your region.

Source: Windows Central (Image credit: Source: Windows Central)
2. Click the **Next** button.
3. Select your keyboard layout setting.

Source: Windows Central (Image credit: Source: Windows Central)
4. Click the **Yes** button.
5. Click the **Skip** button.

Source: Windows Central (Image credit: Source: Windows Central)
After you complete the steps, you can continue with the steps below to configure a local account.
**Solution 4: Disable internet requirements**
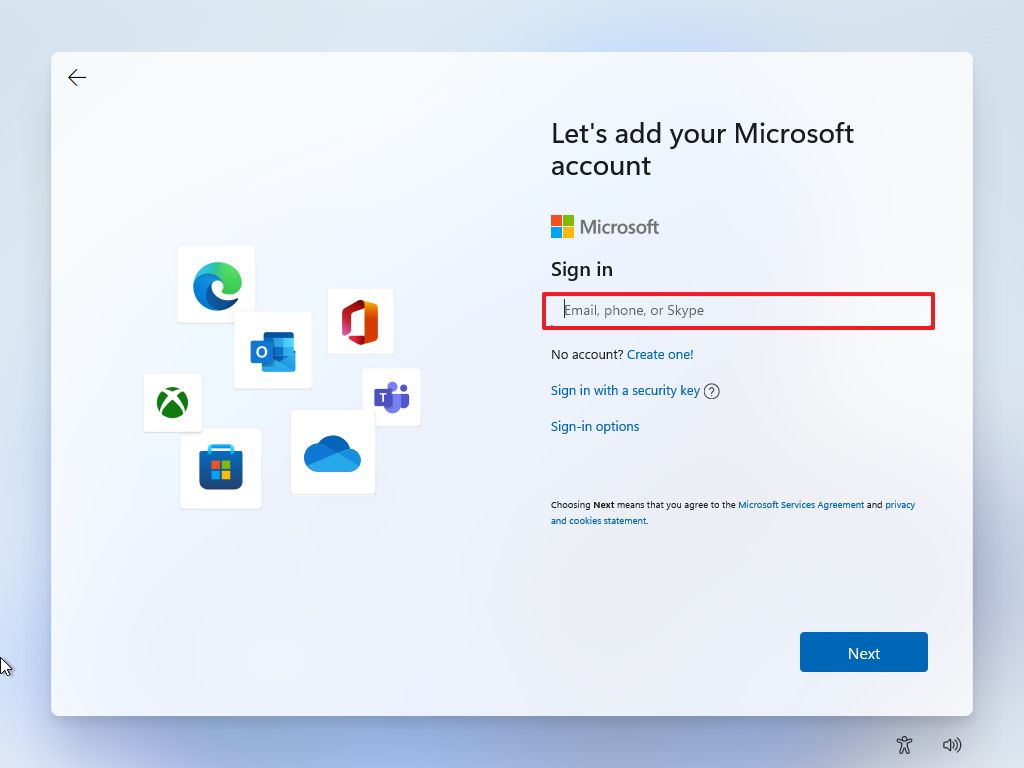
In the "Let's add your Microsoft account" page, use these steps:
1. Confirm a local account username in the "Sign in" field.
Source: Windows Central (Image credit: Source: Windows Central)
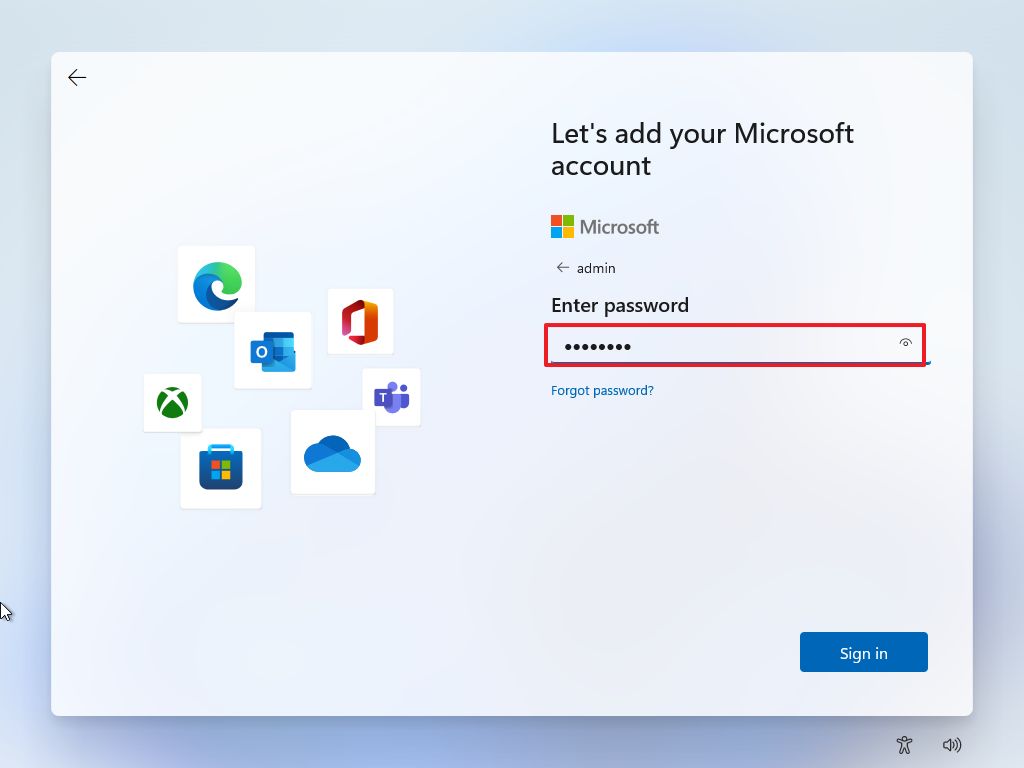
2. Confirm a random password for the account.
Source: Windows Central (Image credit: Source: Windows Central)
3. Click the **Sign in** button.
4. Click the **Next** button on the "Oops, something went wrong" error page.

Source: Windows Central (Image credit: Source: Windows Central)
5. Create a name for the local account.

Source: Windows Central (Image credit: Source: Windows Central)
6. Click the **Next** button.
7. Create a password for the account.

Source: Windows Central (Image credit: Source: Windows Central)
8. Click the **Next** button.
9. Complete the three security questions to recover the account (if applicable).
10. Click the **Next** button.
11. Choose your privacy settings.

Source: Windows Central (Image credit: Source: Windows Central)
12. Click the **Next** button.
13. Click the **Next** button again.
14. Click the **Accept** button.
Once you complete the steps, you will be able to continue the setup of Windows 11 without a Microsoft account.
## More Windows resources
For more helpful articles, coverage, and answers to common questions about Windows 10 and Windows 11, visit the following resources:
- [Windows 11 on Windows Central — All you need to know](https://www.windowscentral.com/windows-11)
- Windows 11 help, tips, and tricks
- [Windows 10 on Windows Central — All you need to know](https://www.windowscentral.com/software-apps/windows-10)
Mauro Huculak is technical writer for WindowsCentral.com. His primary focus is to write comprehensive how-tos to help users get the most out of Windows 10 and its many related technologies. He has an IT background with professional certifications from Microsoft, Cisco, and CompTIA, and he's a recognized member of the Microsoft MVP community.